

Over the numerous years I’ve baked bread, and the countless nights my dough has proofed overnight in the family fridge, there have been (so many) times where I yearned for the luxury, and sometimes a necessity, of a dedicated space for my dough. An open, expansive space where I could control the temperature and didn’t have to fight with those items that spoil at warmer temperatures. Oh, that precious fridge real estate, something highly wrestled for in a family with two kids. I finally decided it was time to remove my dough as a contender for that sought-after space and construct it: a place just for dough. Let’s go into how to build your dough retarder.
This may seem like an extravagance. But when you bake as often as I do, and in ever-increasing quantity, this dough retarder (I like to colloquially call it a fretarder—freezer + retarder) has gradually elevated to necessity. The actual physical space was one motivator but I’ve also yearned for the ability to experiment with warmer proof temperatures (45ºF and above) to test the effect on the resting dough overnight. If you’ve read my posts for a while now you’ll know that I typically push bulk fermentation pretty far and/or I’ll leave the dough out, in shape, for some period of time before retarding in the fridge at 39ºF. This, in effect, helps further the fermentation in the dough but in a different way due to the warm ambient temperature, whereas proofing at a cooler temperature, say 50ºF, has the effect of slowing yeast activity in relation to bacteria activity (more on this below). These varying proof temperatures, warmer than a typical household fridge but cooler than ambient temperatures, are something I’ve wanted to test and experiment with for some time now.
Before construction, I considered many other options for controlling my overnight proof temperature: buy a small wine fridge, search Craigslist for a used refrigerator, purchase a small, professional dough retarder and, of course, continue to use the family fridge. After researching, planning, and plotting, I stumbled on several home beer brewer’s forums. I realized the tools used to control brewing temperatures accurately could work for controlling dough proofing temperatures. Inspired, I picked up a positively reviewed digital thermostat controller, an upright freezer, and a few other small items and began construction.
So how does the digital thermostat controller allow us to proof at any temperature we want? Instead of plugging the freezer directly into the wall for the power, it’s plugged into the thermostat controller. This controller provides power to the freezer only when the sensed temperature inside the freezer goes above a set temperature threshold. Once the inside temperature cools back down to our desired dough proof temperature, it cuts power to the freezer, stopping cooling. Essentially we are bypassing the internal thermostat of the freezer (which can usually only go up to 40-45°F/4-7°C) so we can set it to cool to any temperature we desire.
The tool covered in this post can go by many names: dough proofer, dough retarder, and finally, retarder proofer. While they are all technically correct, the retarder constructed in this post should not be confused with a dough proofer I use during bulk fermentation and house my sourdough starter. As I prefer to call it, this dough retarder keeps the dough at a much colder temperature (typically 40-55°F/4-12°C) during the final fermentation phase of baking. In contrast, the Brød & Taylor proofer cannot actively cool, it can only heat, and I typically use this during the bulk fermentation (first fermentation) phase.
Terminology
First, a quick clarification on terminology: what’s the difference between proofing and retarding?
What is Proofing Bread Dough?
Proofing (or final fermentation) refers to the phase in the baking process when the dough has been shaped and is fermenting until it’s at just the right point to be baked.
What is Retarding Bread Dough?
Retarding signifies the act of placing the dough (whether in bulk or after it’s shaped like I typically do) into a colder environment to slow fermentation (primarily yeast) activity.
So essentially, proofing and retarding can refer to the same period of time in the process if the dough is proofing at a cold temperature.
For more, read through my comprehensive guide to proofing bread dough.
Why Cold Retard Bread Dough?
A cold, overnight proof is not mandatory when making sourdough bread. Perhaps schedule conflicts arise, or you desire a different flavor profile, and the dough benefits more from a few hours on the counter at a warmer temperature instead of the long, cold-proof.
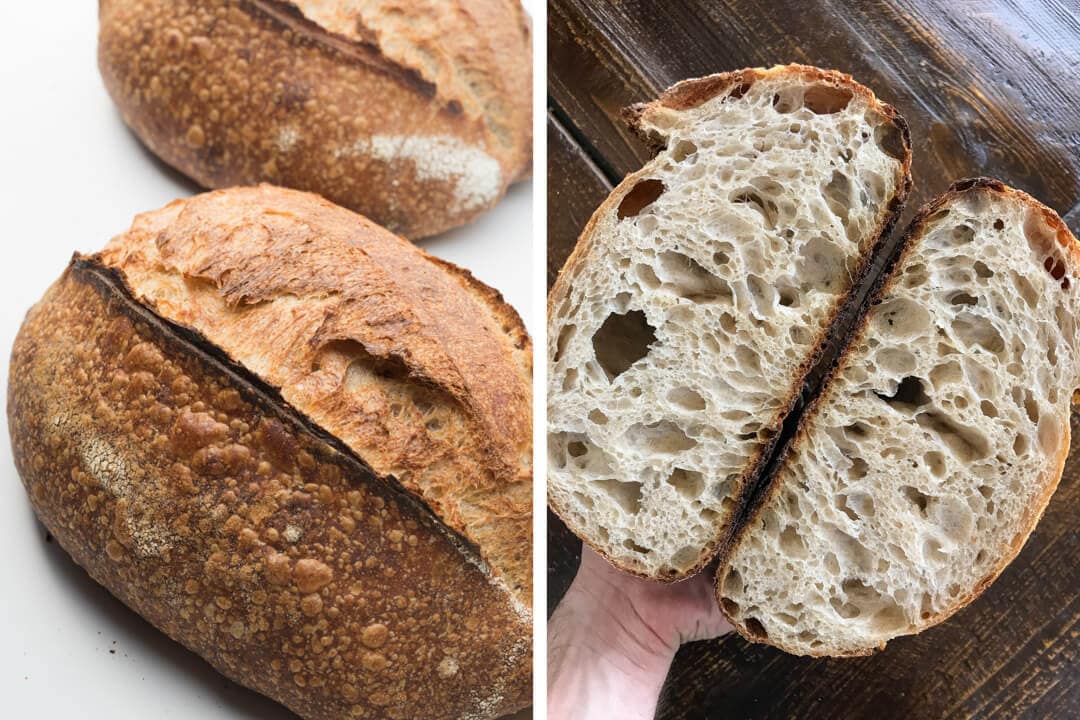
However, I’ve found that counter-proofed dough usually results in a milder flavored bread, where the flavor focus is more on the grain without the subtle sour notes typical of a longer sourdough process. Conversely, I’ve found a retarded dough (at colder temperatures) to have more depth of flavor (I usually call this depth complexity) due to the increased acidity produced during the long, cold-proof.
At colder temperatures, wild yeast activity is typically slowed in relation to the bacteria (Lactobacilli) that makes lactic and acetic acids (flavor!). Also, the crust coloring I achieve on retarded doughs is typically much more to my liking, usually with a wide gamut of colors ranging from light browns to dark mahogany.
Construction Materials
First, a breakdown of the ancillary materials I used for construction, and then I will briefly delve into the major pieces with additional detail. Some of the items below are optional but are things I’ve installed for convenience mostly, but also for monitoring performance.
- Silicone sealant to seal the drill hole where the thermostat probe is inserted (any general silicone sealant will work as long as it adheres to the interior material of your freezer)
- Interior LED lights. These are fantastic motion-sensitive and magnetic lights. They will stick to the interior of the freezer
- Temperature and humidity monitor
- 12” x 1/4” Dewalt extra-long drill bit
- Plastic zip-ties
Digital Thermostat
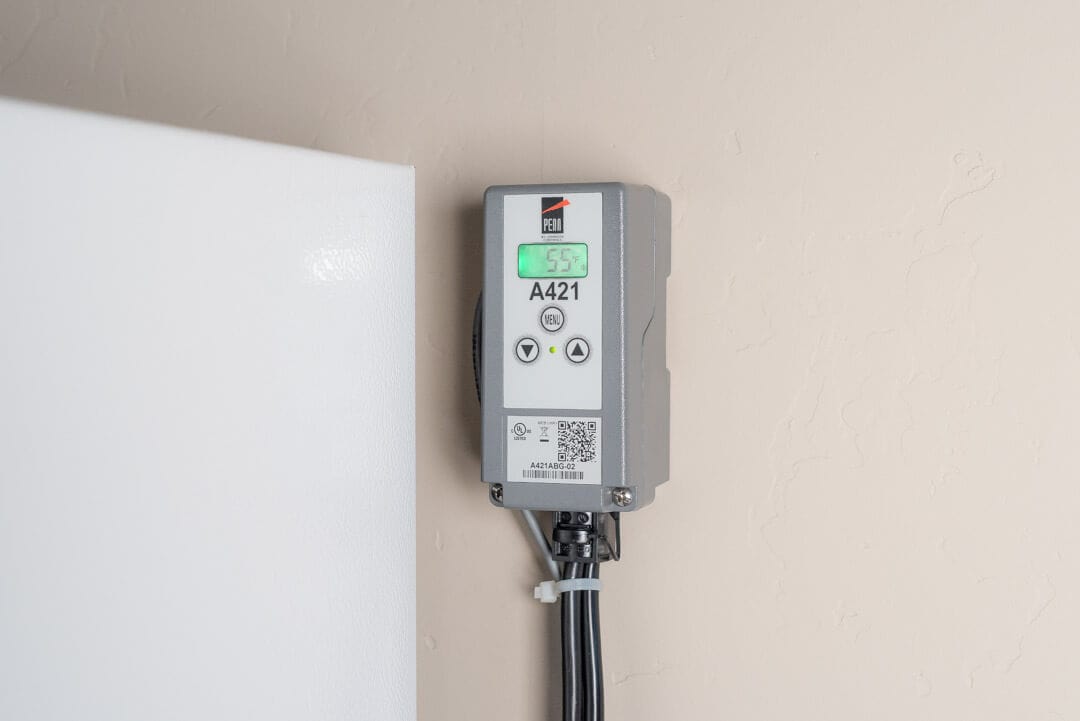
The Johnson Controls Digital Thermostat Control Unit is the best unit I found to control the temperature inside the freezer. There are others with an analog display, but it’s nice to have a lit, digital readout to make reading and setting the temperature quick and easy.
As I described above, the thermostat controller performs a very simple task: it provides power to the freezer only when the internal sensed temperature rises above the selected proof temperature. When the freezer’s compressor kicks on, the interior will cool until it gets to the selected temperature, and then the controller cuts power to prevent further cooling.
The control unit is also capable of running in heating mode (the opposite of what we want) as well, but since we are only concerned with retarding at cool temperatures (and we have no active heating) we can ignore this capability. Just note that on the control unit display if you have things programmed incorrectly a little flame icon will be displayed instead of a snowflake (make sure it shows a snowflake!) — see below for images of the display set to the correct cooling mode.
Upright Freezer
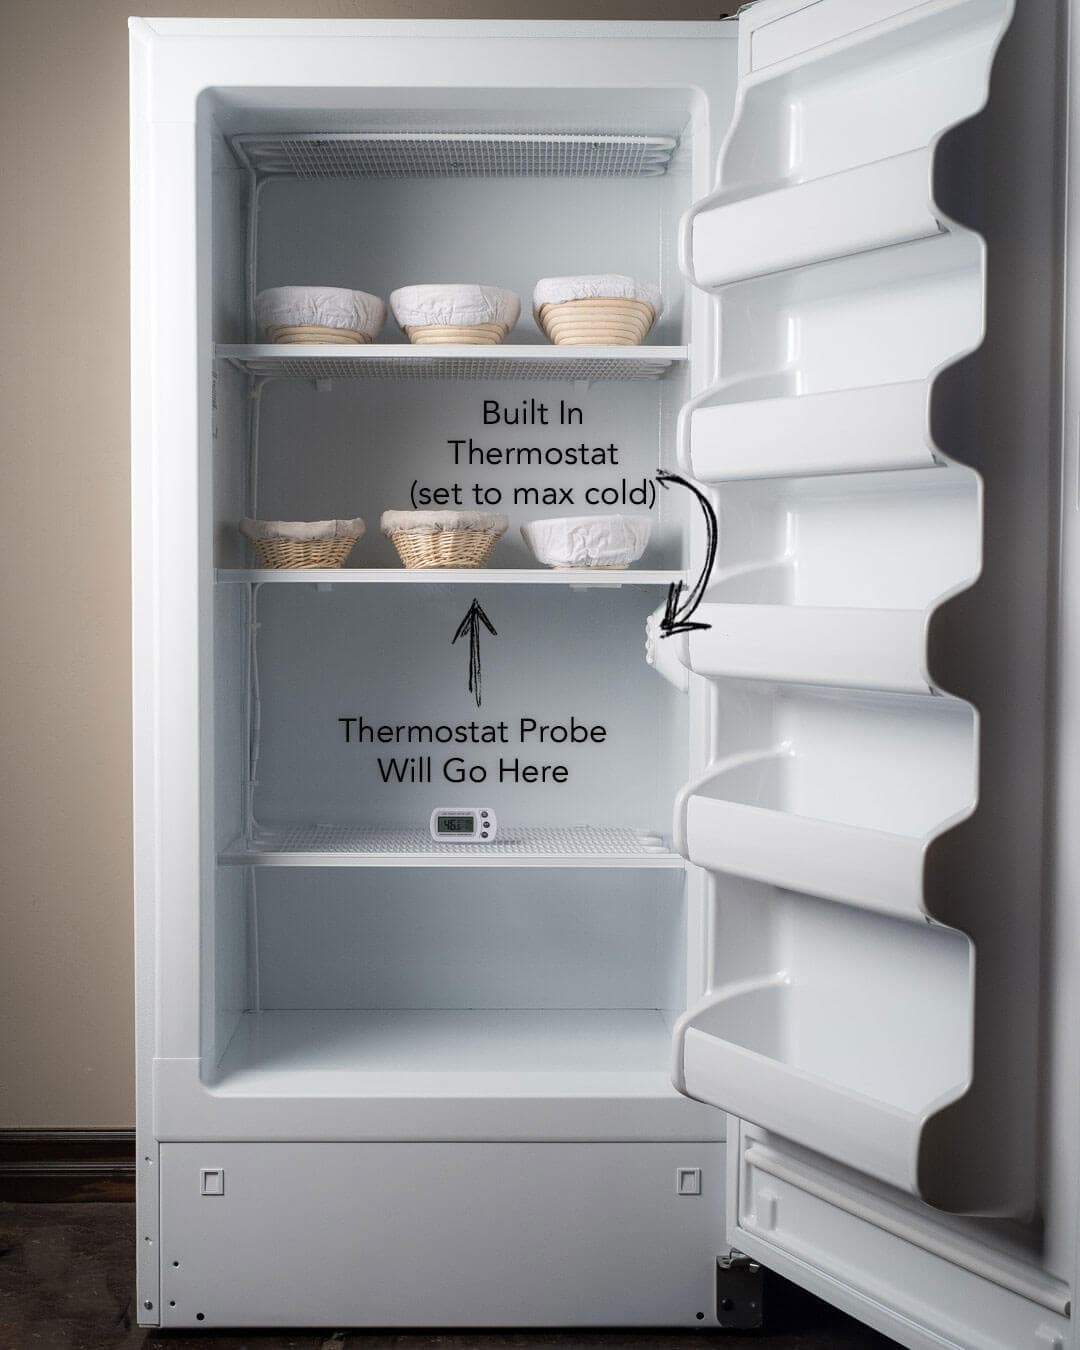
You could use any freezer or fridge to build your own dough retarder, even a second-hand one you might have lying around or one sourced from Craigslist. I chose to use a Frigidaire 12.8 cu. ft. upright freezer because as it fits all my selection criteria: a single tall inside cavity with no bins, simple shelving, door shelves (I’ll use these to store whole grain flour), it’s not frost-free, it has a compressor for cooling (a compressor, instead of some other cooling mechanism, will cool the interior faster, and it has thick walls with significant insulation.
The freezer is large at 30.25″ deep, 62.2″ tall, and 29.6″ wide, and I’m sure I can fit in a significant amount of dough. I figure at least 12 x 1kg batards (3 baskets on each of 4 shelves), and probably more if I got creative with stacking and/or constructing more shelves.
I specifically chose a unit that’s not frost free as some of these units can suck moisture out of the inside cavity to prevent extra condensation buildup. Humidity will be important inside the freezer, we don’t want our dough to dry out if you don’t want to cover your dough with plastic bags. If you can’t find a frost free freezer don’t worry, you can always cover your baskets as I’ve done for quite a while.
Build Your Own Dough Retarder
There are two options for constructing the unit: to drill or not to drill. If you want to drill through the freezer for the cleanest install proceed with Step 1, below. If instead, you’d like to simply run the temperature probe through the front opening of the freezer you can skip drilling altogether and simply tape the sensor wire so it’s off the floor and cleanly enters the freezer. Then, secure the sensor to somewhere inside the freezer as I’ve done in Step 2 below.
Gather the materials outlined above, and:
- a drill
- a tape measure
- a pencil
- protective eyewear
Step 1
First, ensure the freezer unit is unplugged.
Measure out the height from floor to where you want to insert the temperature probe. Try to pick a spot that will measure an average temperature of the inside cavity, away from any areas that are secluded, near a vent or cooling element.
Make sure the spot you choose for drilling does not have any coolant piping or other sensitive material that could be damaged.
In my freezer, I decided to mount the sensor probe in the dead middle of the unit, in terms of height and width. When I received the freezer I measured temperatures throughout the interior over the course of a few days to find a place where the temperature was most stable and provided the most accurate representation of the entire inside cavity temperature.
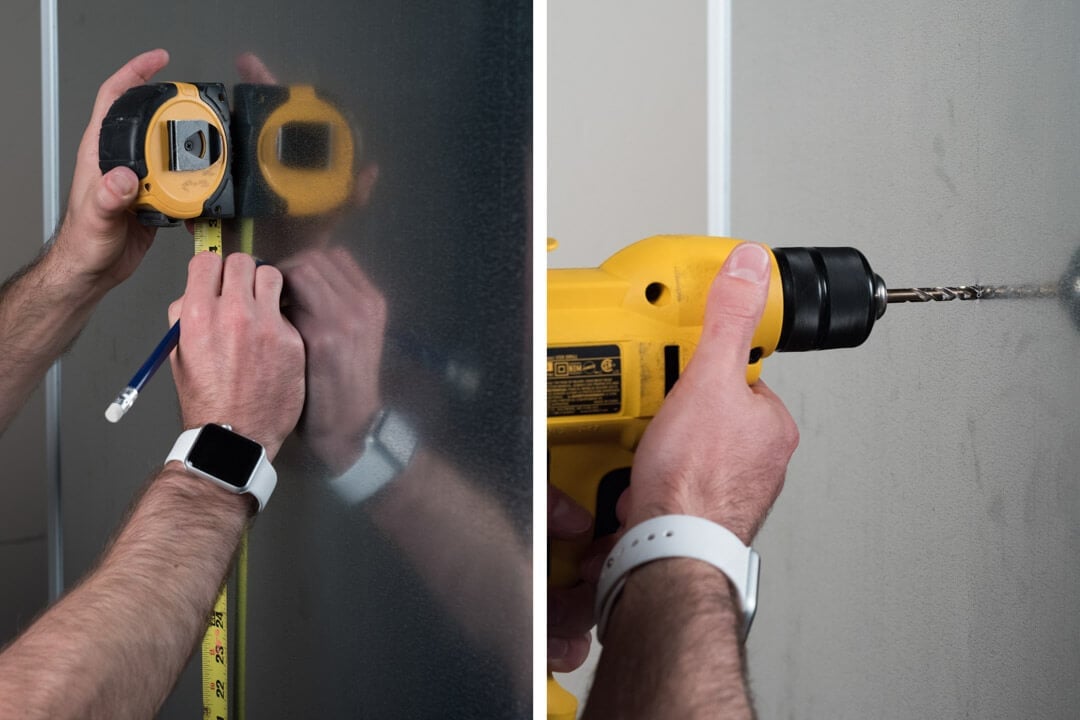
Go to the back of the unit and measure from the floor up to the spot you chose from the front. Mark with a pencil and get out your drill.
Step 2
Put on protective eyewear and, using a drill with an extra-long drill bit attached, slowly drill through the back of the unit until you feel it puncture into the inside cavity.
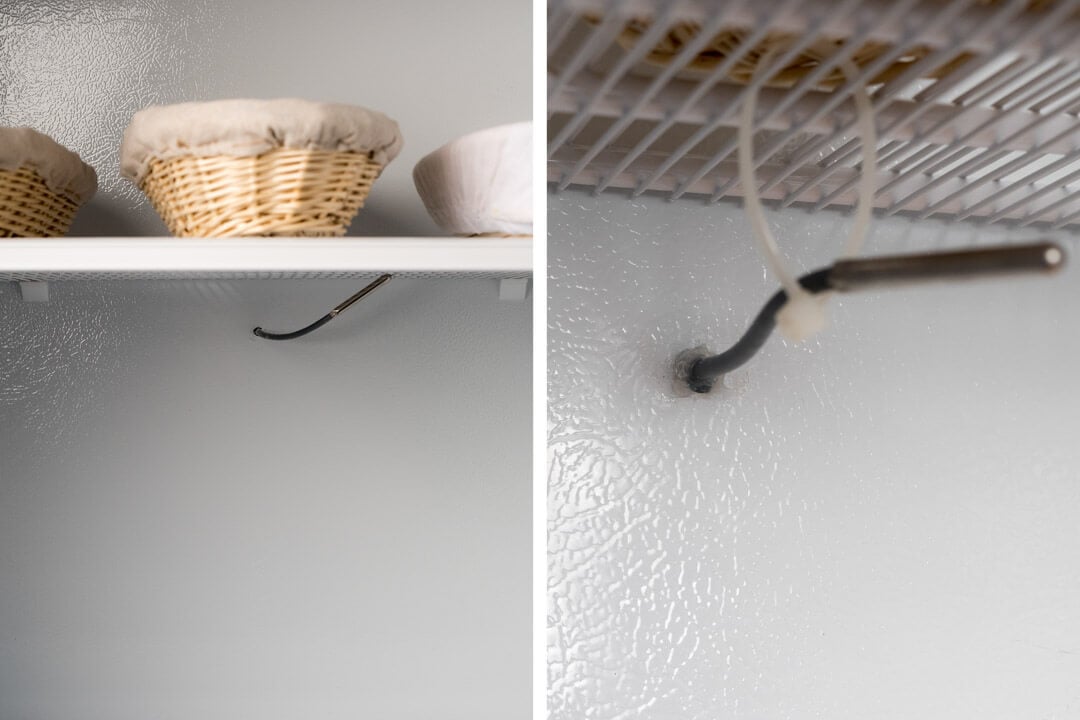
Run the temperature sensor into the hole from the back of the unit and secure it to the inside. I used a simple plastic zip-tie to hang the sensor from the bottom of the second shelf. Then, using the silicone sealant, seal the hole around the sensor so no cold air can escape. You can also seal the other end of the drilled hole on the outside of the unit if desired (I did).
Step 3
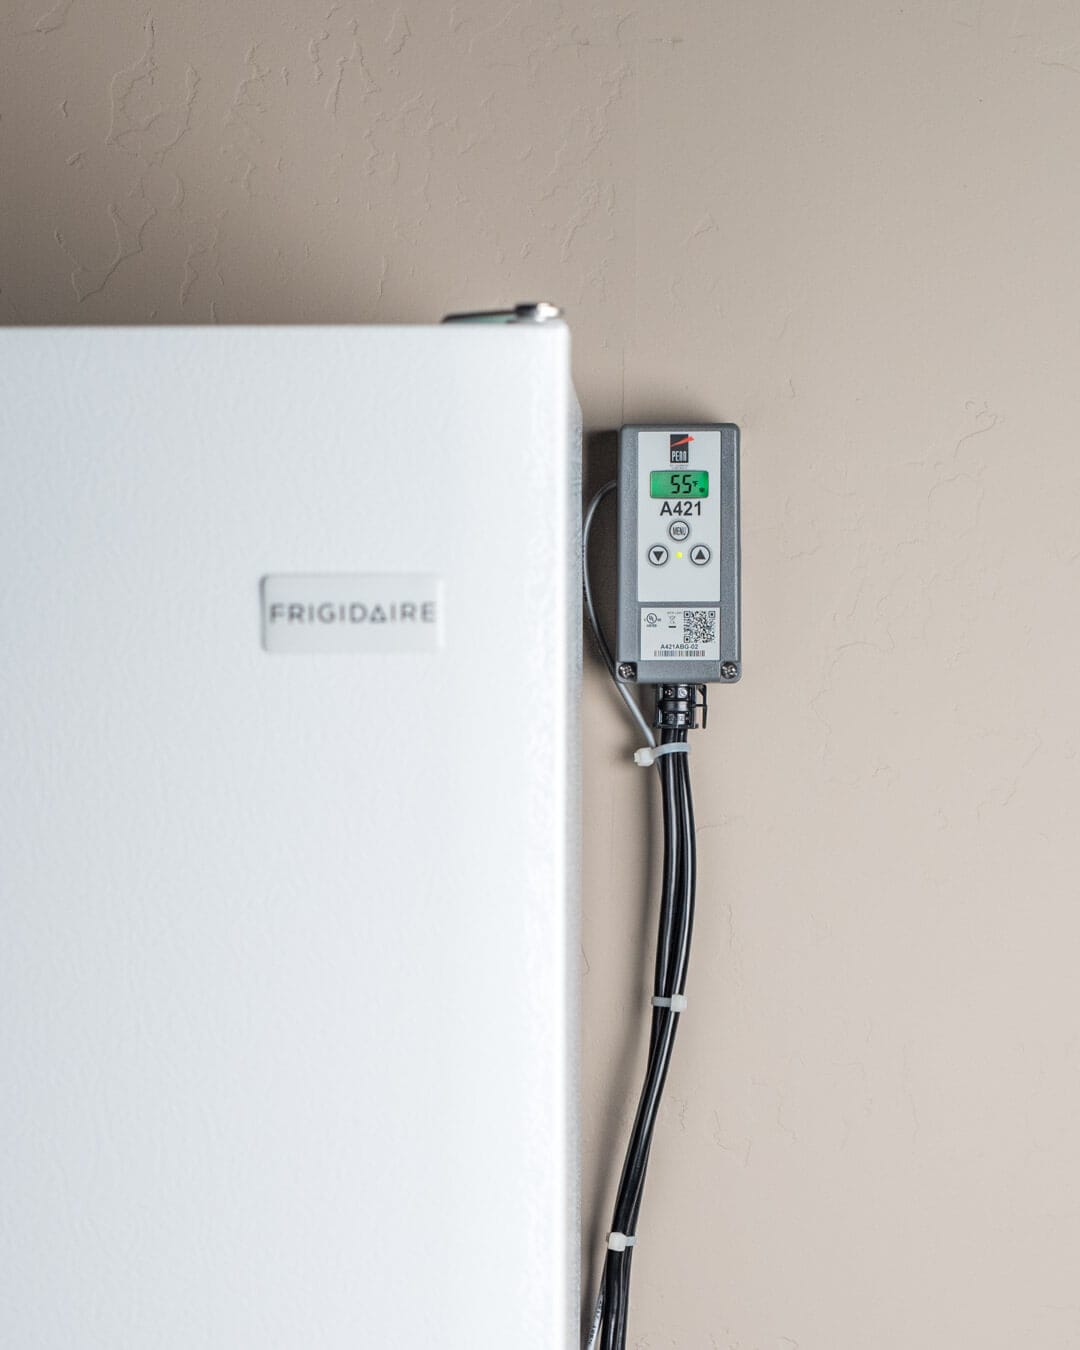
Mount or place the digital thermostat controller somewhere convenient. I chose to mount the unit to the wall next to the freezer and zipped the cables to keep it clean. Plug the digital thermostat into the wall and then the freezer into the controller.
Step 4
Set the interior freezer temperature thermostat to the coldest setting. Mine is a small dial inside that only has an analog turn dial from “coldest” to “warmest.” Since our installed thermostat controller will control the temperature from here on out, the one that shipped with the freezer can be set to the coldest setting so it will cool as fast as possible when the freezer is turned back on.
Mount any interior LED lights and other nice-to-haves and program the digital thermostat (see Operation, below) to your desired proof temperature.
Upgrades
2020 Update: Over the years since first posting this, I’ve found and added a few things to my dough retarder to get better performance.
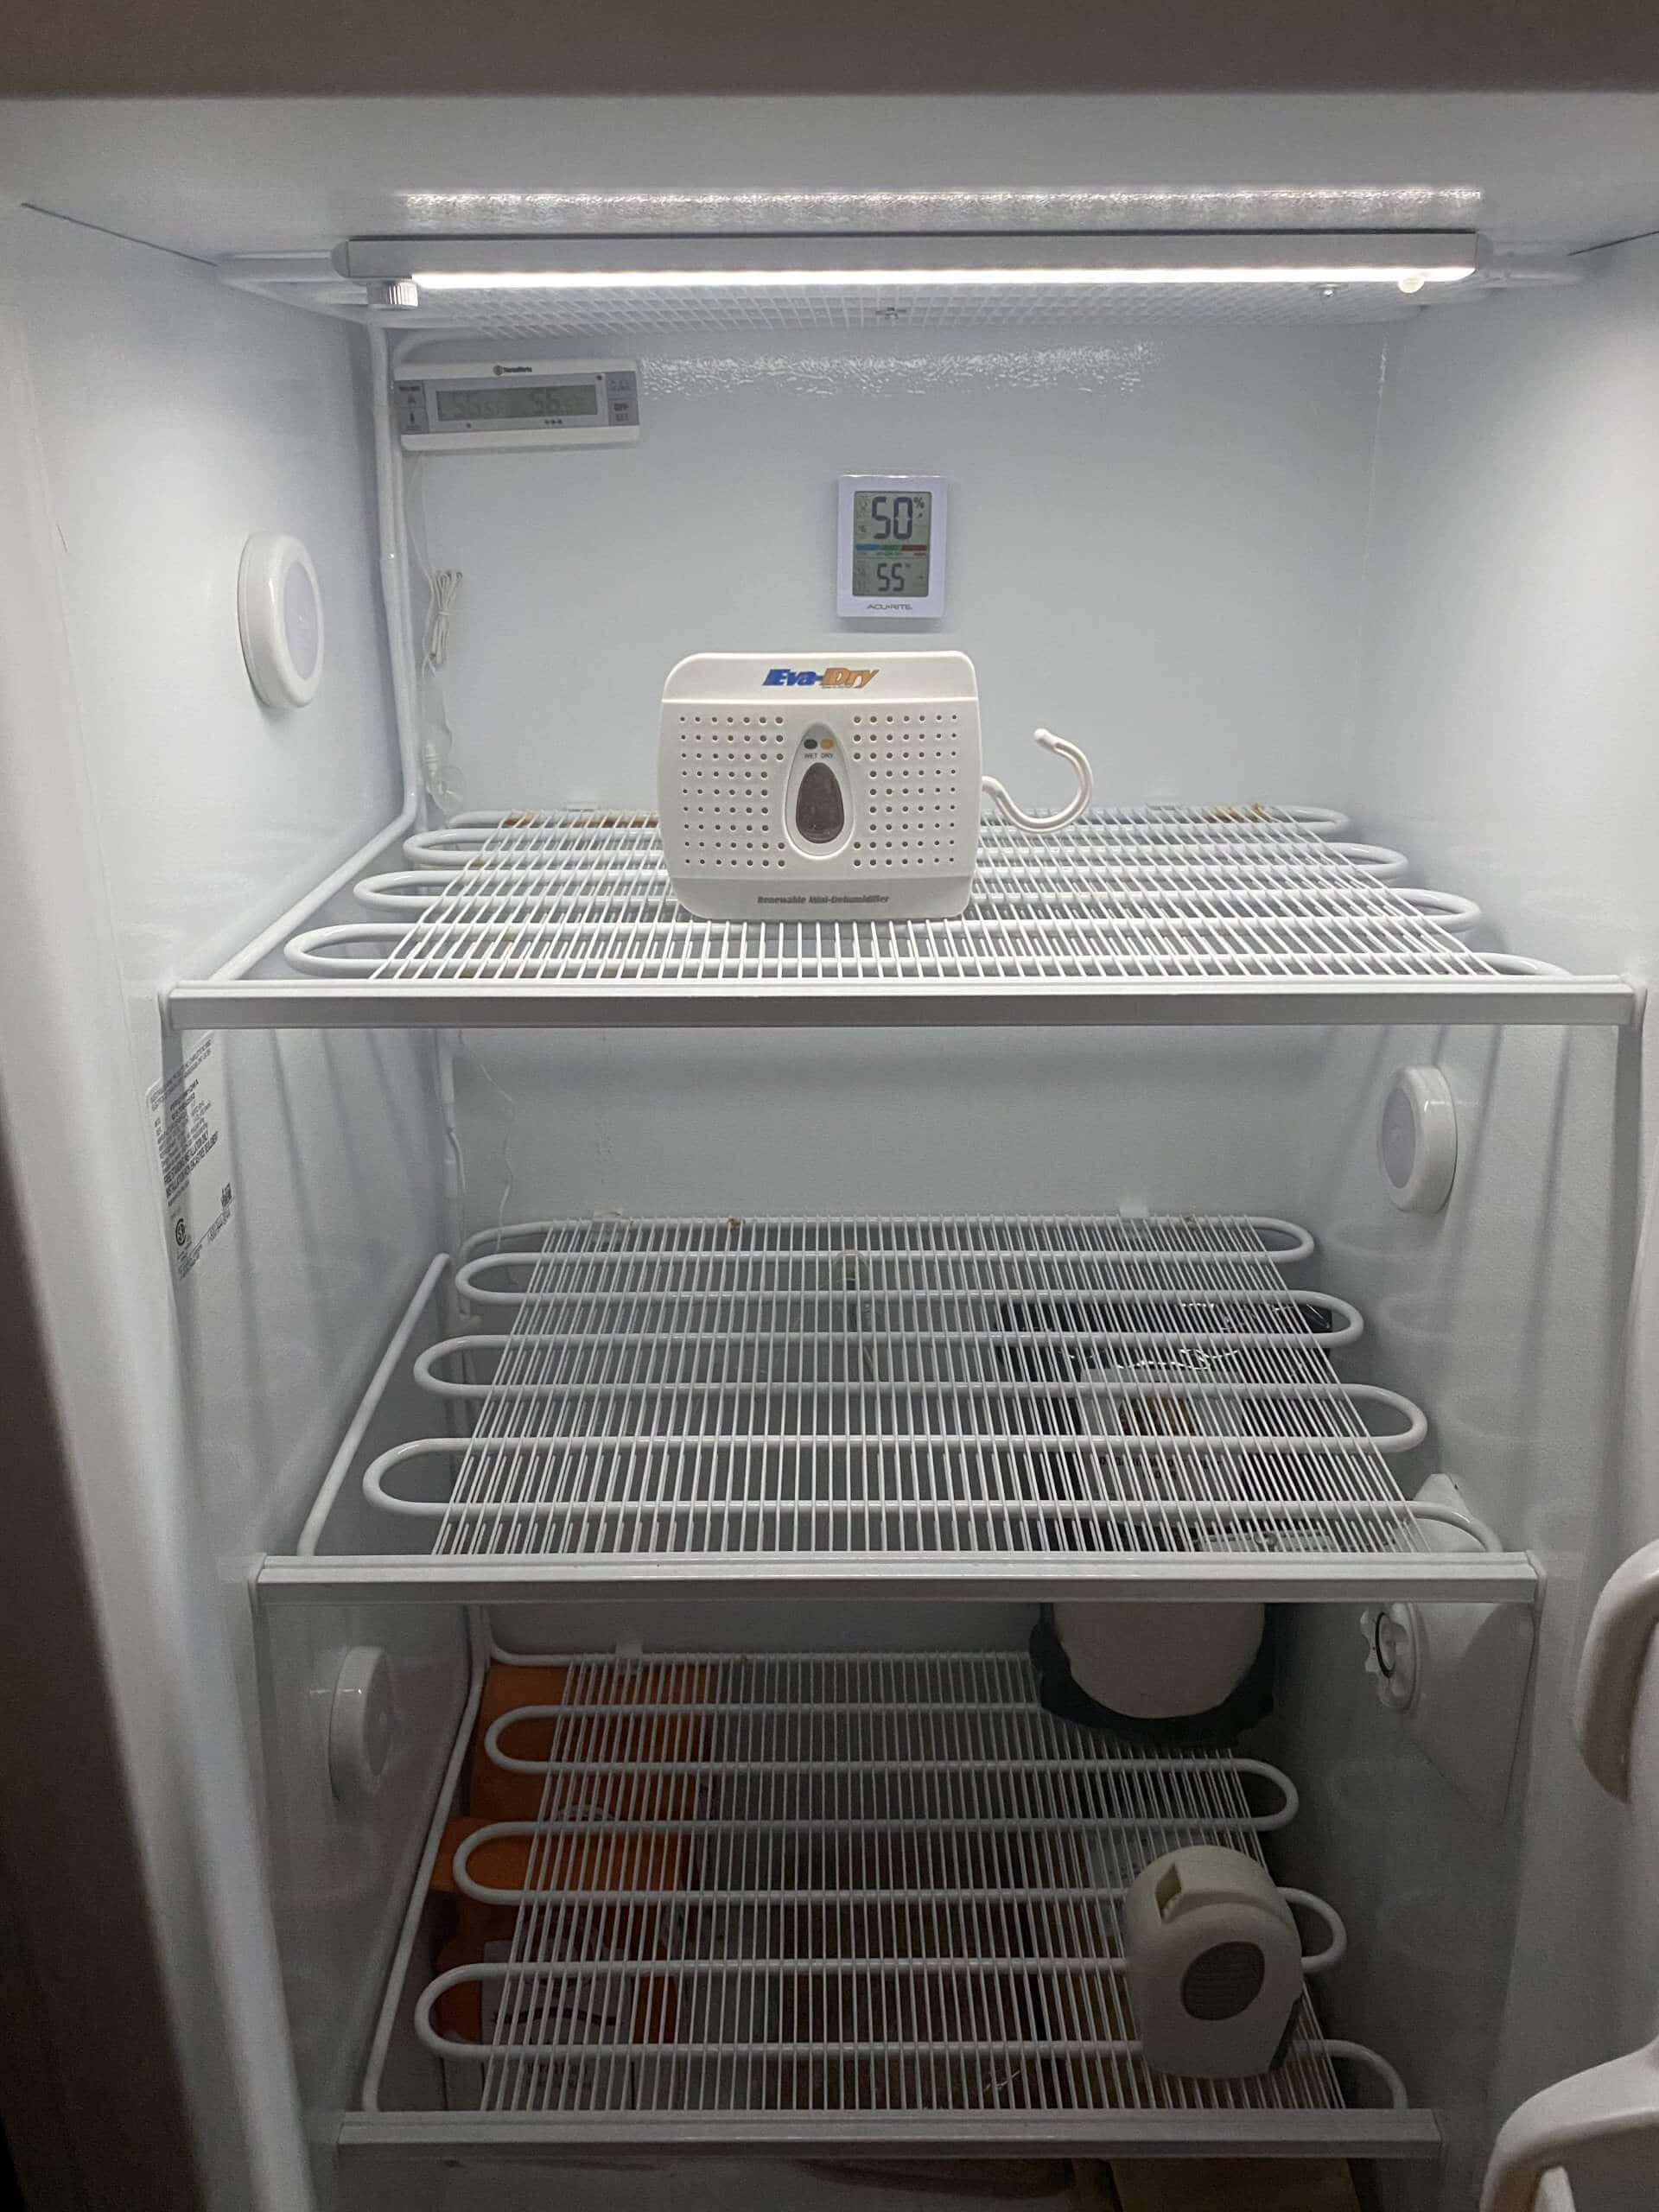
The first is the LED light bar (attached to the top of the freezer in the photo above) linked in the materials section above. This LED light bar is just incredible and fully illuminates the retarder once you open the door.
Next is the small battery-operated air circulator you see in the lower-right. This thing lasts for months on a set of batteries and keeps the air in the freezer moving. I turn it on when I load my dough to help cool them faster, dropping them to the temperature specified for the entire retarder.
Finally, in the middle, you see a small dehumidifier. I keep this in the retarder at all times when the dough is not inside. This way, I can avoid excessive moisture from collecting inside the retarder. When I load my dough to proof, I take the dehumidifier out, plug it in to “recharge” it, and then put it back into the retarder when I take the dough out to bake.
Operation
Setting A Temperature on the Digital Thermostat
First, I would recommend you read the owner’s manual on the new controller so you understand all the functions, even if the manual can be a little cryptic.
Setting the desired temperature is a pretty straightforward process. There are 3 buttons on the face of the unit: 1) MENU, 2) UP arrow, and 3) DOWN arrow. Pressing MENU will cycle through the options for the controller and the UP and DOWN arrows will modify the value for each option. The two we are most concerned with are the OFF and ON options.
OFF signifies when the digital thermostat should cut power to the freezer (so it stops cooling). For example, if we want the internal temperature to be 50°F (10°C), we would set the OFF option to 49°F (9°C). This means the freezer will turn off when it’s cooled down to 49°F (9°C), which is 1-degree lower than our target.
Conversely, the ON option signifies when the digital thermostat should provide power to the freezer (so it cools). Continuing with our example, if we desired an internal temperature of 50°F (10°C), we would see the ON option to 51°F (10°C). This means the freezer will turn on and cool once the internal temperature reaches 51°F (10°C) and above.
So, if we wanted to retard our dough at 50°F (10°C) we’d:
- Press MENU until the unit displays OFF, then press MENU one more time to see the OFF value
- Press the UP or DOWN arrow until the display shows one degree Fahrenheit below our target of 50 (so OFF should show 49°F/9°C)
- Press MENU until the unit displays ON, then press MENU one more time to see the ON value
- Press the UP or DOWN arrow until the display shows one degree Fahrenheit above our target of 50 (so ON should show 51°F/10°C)
- Press both the UP and DOWN arrows simultaneously to exit the programming menu and let the unit run (you can also just leave at this point, and the digital controller will eventually exit programming)
That’s it! The controller display should now show a single temperature, the current sensed temperature inside the freezer, and also a little snowflake in the lower right indicating it’s in cooling mode (if you see a little flame, this means you have the OFF and ON temperatures reversed, modify your temperatures so the OFF temperature is a smaller value than the ON temperature).
It seems like a lot of steps, but once you get the hang of programming the controller, you’ll do it in a matter of seconds.
How I Retard My Dough
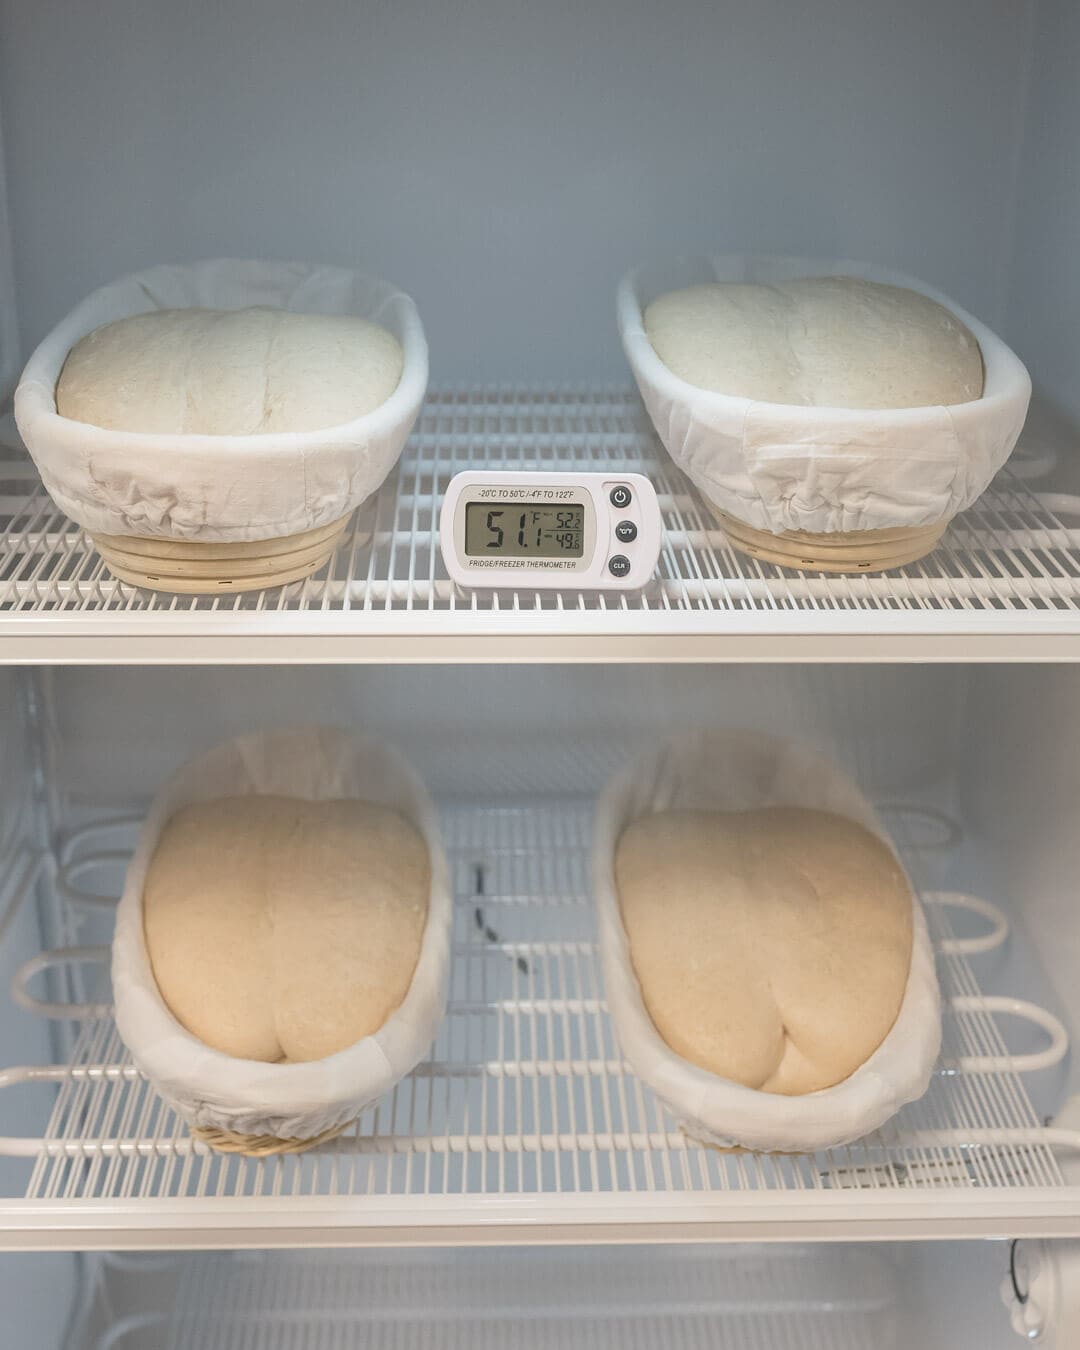
I typically turn on the retarder at the end of my bulk fermentation or during bench rest and set my desired temperature. Once I’m done shaping and the dough is in its proofing basket, I’ll simply place the baskets in the unit and shut the door quickly.
I’ve been monitoring the humidity in my freezer through many bakes, and I’ve noticed the freezer traps humidity extremely well (it usually ranges between 80% and 90%). Because of this, I no longer need to bag my baskets as I have done in the past—fantastic.
If you notice the humidity in your unit is not high enough, you may still need to place your baskets in food-grade plastic bags while proofing.
Performance and Energy Use
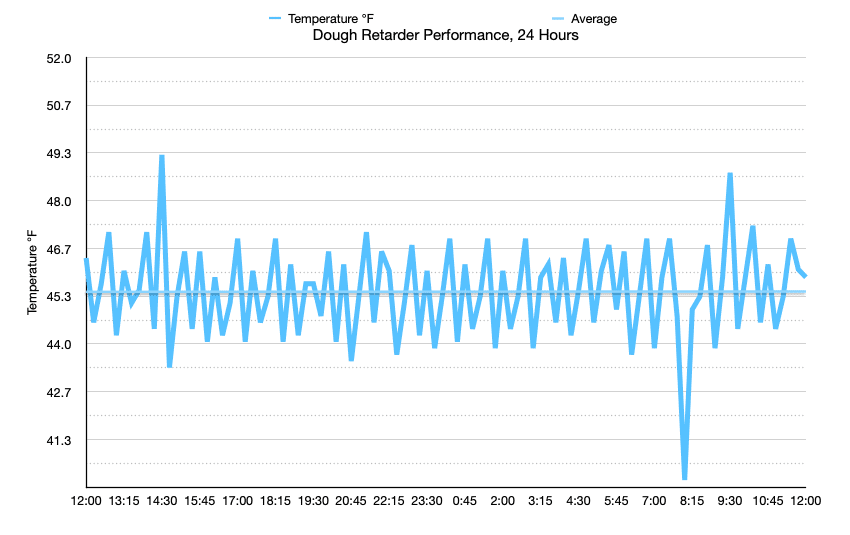
I monitored the temperature inside the unit over the course of 12 hours to try and determine the effectiveness of the setup. Ignoring the small amount of error introduced by my opening and closing the unit very briefly to read the temperature, I found that over 12 hours, the unit performed extremely well.
There were a few blips up and down, but the time it took the retarder to get back up to temp or drop back down wasn’t very significant. Plus, you have to remember it will take time for the dough mass of each loaf to change temperature. A short blip won’t have a significant effect.
The unit was set to a temperature of 45°F (7°C) for testing (the “ON” setting was set to 46°F/8°C and the “OFF” setting was set to 44°F/3°C) and, as you can see in the chart on the right, the deltas from the target temperature was very minimal over the course of the 12 hours. The end result was approximately a 45-46°F (7-8°C) average during that time period. Stellar.
These upright deep freezers have incredibly thick walls and thick rubber seals to help keep the cold in and the hot out. Because of this heavy insulation, the reality is this unit will not frequently turn on the compressor to cool the interior. Once the retarder is loaded with dough, the door is closed, and the interior reaches the initial desired temperature range, it will usually remain idle for many hours before needing to kick the compressor back on.
Further, when I’m not baking I’ll typically just turn the unit completely off by unplugging it (unplug the freezer from the thermostat controller) or I program the thermostat to a high temperature. When I’m baking, I’ll turn it back on at the end of bulk fermentation to let it cool to my desired temperature in preparation for use.
Conclusion
I realize not everyone will want to go the lengths to build their own dough retarder as I have—I am kind of obsessed, as you know. However, I decided I’d document my process for building this unit and the tests I’ve undergone in the hopes you might one day build your own dough retarder.
While this post documents every little step I’ve taken to build this thing, when you boil it down, it’s really a very simple set of steps to construct. Over the last couple of months I’ve used this fretarder I’ve wondered one thing: why didn’t I build this sooner?
For more of the best tools I’ve found for baking, head to My Baking Tools page.


89 Comments
Hey Maurizio, thanks for this guide!
I just purchased thePenn Digital Thermo and the Frigidaire upright freezer in order to build your setup. Temp wise, it works great! But the Frigidaire beeps every time it turns back on (it's pretty loud). So there's a pretty regular chirping.
I reached out to Frigidaire and they didn't have any advice on how to disable the audio alert. Did you encounter this problem at all, and if so do you have a fix for it?
sounds to me that cold retarding (in the fridge) is still something controversial. ANDREW JANJIGIAN in his blog recently wrote a post (https://newsletter.wordloaf.org/p/continuous-sourdough-starter-maintenance) where highlights the cons of maintaining sourdough starter in the fridge and replying to my comment where i said that thus for the same reasons we should not retard the dough in the fridge (like most if not all of the books state) he wrote: “Retarding at fridge temps is actually not ideal for the same reasons, which is why bakers with retarder-proofers often set it to 55F or so, which is on the low end of the ideal temperature range for sourdough fermentations.”
(…)
“I retard many of my breads, but only out of convenience, not because it is “better” (it isn’t). Bakeries do it because it allows space between shaping and baking, and the ability to stagger bakes from a single batch. A room temperature final proof will generally give you better oven spring; choosing to retard or not is a compromise between convenience and results.” And when I replied that many bakers and book writers think tat cold retarding will improve flavors, he replied: “I think same day bakes are better, yes! Chilling the exterior of the loaf can help with cleaner scoring, so one approach I like is to proof the loaf until ~75% expanded, then move it to the fridge while the oven/pot heats up.”
Your thoughts?
Thanks!
For me, a cold-proofed dough ends up having more pronounced sour flavor. Yes, agreed, the home fridge is a little too cold for the best results—but!—keep in mind the dough takes time to cool down to those temps. During that time, it passes through “optimal” temps and fermentation does continue. Eventually, it’ll reach fridge temp and stall out (mostly), but again, there’s quite a bit of time in there.
It’s easy to do a test in your kitchen. Make a double batch, bake one direct (ambient proofed), bake one retarded. Taste the difference!
To be clear, I LOVE both methods, and I do both often depending on what I’m after, and yeah, when I need more time, I retard 🙂
I agree with you. I di sort of the test and my impression is that the bread that has not cold fermented had a more significant oven spring but sort of “flat” flavor while the cold fermented had better tasty flavor but less oven spring. My fridge is very cold; it ha e feature that when you put something in it tested for temp and boost to reach quickly 4°. I should maybe try put the dough on higher fridge shelf. Thanks!!
Very informative, as always. I have a wine refrigerator that can be set as low as 46F. I often place my loaves in this wine cellar for final proofing. Just a suggestion for others who may have one as well.
P.S. It’s also a great place to keep potatoes. I live in Florida where it is too hot to leave them out.
That’s a fantastic temp there, Laura! I used to use a WF like this as well (until I grew out of the space!).
Fantastic post and great build. I have been holding off buying the brod and taylor proofer in the hopes that they would make a newer version that cooled as well. But, using my oven with the light left on during the winter uses space I usually cook in so now I have bitten the bullet and bought the proofer. So excited to use it. I shall also look into making one of these following your simple instructions.
One question which is not related, how do you bake every day but have a 9-5 job. Would love a fresh loaf every day but struggling to figure this one out.
Check out my schedules on the Guides page for how to do this!
Thank you so much for your post. In your research what is the commercial alternative here if you had a little more space but not room for a walk-in. Is there a classic refrigerator size equivalent that is the standard? I’d imagine there is a scientific use for such a piece of equipment. The price jumps from what I see are fairly drastic.
There are definitely commercial off the shelf retarders you might want to look for, especially if you’re going to have lots of dough in there! The main benefit there is it should be able to better handle high levels of humidity, which will build up in the retarder…
I am really struggling to proof dough here in Thailand as ambiant temp is 33C in the day, would i be able to use this to keep at a good temp for proofing you think.
That is warm! This will cool far too much, but, if you buy a refrigerator (not a freezer), it will work!
why are you using freezer and not the fridge?
I use a freezer to be able to go as low as I’d like, the external controller allows me to set the temp. I usually do around 42F (5C) for most of my proofing.
ok, got it. Thanks
I am in Bangkok and have the same issue. I have to take it in and out of the fridge during stretch and fold then put them in the fridge to retard overnight. Totally manual, control environment would be nice but the electric bill will go through the roof.
Yes it’s a pain for sue
I loved this post and considering make one for me. let me know how you keep moisture inside the freezer, because I didn’t understand this part. I have a lot of troubles drying out the surface of the loaves proofing overnight in a regular fridge. Thanks Maurizio for your amazing content as always.
You’re very welcome, Lucas! The freezer I have is sealed, so any moisture inside stays inside. IOW, the freezer doesn’t dehumidify what’s inside. If you have one that does, you can always cover the dough with wrap!
Hi Maurizio,
Great article and great explanation on how to build a retarder.
Over the time that I have been baking I mostly used your site and i usually retard at 4C. I have noticed that there is little to no rise in this period and often have a hard top of the dough that looks a little brown as well. I figured it was because of the fridge being so cold, I also saw some ice forming in the back of the fridge haha.
This off course is bad for the dough so I’m happy to see I should retard at a higher temperature. Now I was wondering how long I can retard proof when the fridge is set to 50 Fahrenheit like you do in your retarder?
Thanks a lot in advance!
Thanks, Nick. Not seeing any rise during fridge proof is pretty typical, it’s cold in there (esp. if there’s ice!). For me, I can usually only go 8hrs when I go up above 46-48F, but it absolutely depends on the process and the dough at hand. If a dough is very well-fermented coming out of bulk, it won’t last through a warmer retard. So it depends!
What would be your maximum amount of time when retarding on 46F? Could you do 12-16 hours? Good to know it’s not unusual to not have any rise in the fridge, still I don’t think it’s good that it comes out so hard on the top so a bit warmer 39F would be better for my dough I think?
Sure, you could definitely do 12-16 hours at that temp, provided your dough and process are setup to handle that amount of time (i.e., not super well-fermented going into bulk, maybe a reduced hydration to gain dough stability, etc.). If you’re finding it super hard on top because it’s drying out, be sure they’re covered airtight. If it’s actually freezing on top, then, yes, too cold! The dough should be soft and pliable.
That’s great advice once again, thank you so much!
Hi Maurizio,
Just wondering if you drop your levain % to prove at higher temps? The coolrooms at work have just been changed so now I’m trying to figure out how to proof at 10-12c overnight. Is it possible to shorten the bulk proof?
Your site has been a good send to me by the way! Thank you so much for sharing all your knowledge and experiences!
Many thanks, Oscar
That’s certainly one technique I use—i’ll drop the levain percentage if I need to extend the fermentation time. I’ve found you can shorten the bulk, but there’s really a limit there. I don’t like to go too much below 2.5-3 hours, depending on all the other parameters (and I’d say 90% of the time, not less than 3h). Hope that helps!
Thanks heaps for your reply! Yes, very helpful. I suspected that I couldn’t do too much in terms of bulk… Will play around with levain% and see how it goes
Someone PLEASE MAKE A cooling proofer like the Brod & Taylor only for cooling! I have 2 brod & taylor proofers but I live in FL and 8-9 months it is too hot here and I cannot proof below the ambient temp! I purchased a small incubator but the ambient temp cannot be more that 18C so at night I cannot do the retard at 38 F unless the house ambient temp is 70 or lower, which is too cold for my husband! So I have these two Brod & Taylor proofers that I can use MAYBE 10 times a year as I bake once a week!
That’s exactly what this is! Although, it is a bit larger 🙂
I have the same issue in South Florida when I make beer and bake bread. Most people need a warmer for their fermenter, I need a constant cooling that I had to build from an A/C unit!
Thanks for another great post Maurizio!
I finally built one of my own recently and I’ve been super happy. Like many people, I am space limited for kitchen equipment, so I paired a Magic Chef 4.4 cu. ft. Freezerless Mini Fridge with an Inkbird ITC-308 controller. This setup is much smaller than yours, but with the door accessories removed, I can easily fit six 17″ x 6″ bannetons in it – plenty for me!
I have had initial good luck retarding Country bread and Oat Porridge bread for 12 hours at 50ºF but my Ode to Bourdon attempt seemed overproofed with the same treatment. Any updates on how you have used yours, e.g., time vs. temperature vs. recipe?
Ya tried with the inkbird itc-308 and just think the temp swings are too large.
The issue is let’s say I set it for 55f. If it gets to 56f it’ll kick the compressor on, but then it will wildly over cool it to like 48f. I don’t think it reacts fast enough to.
Going to buy the Johnson controller as I think having the setpoint to turn off the compressor will solve the problem.
Maurizio, what is an acceptable amount of variance to you? Should it stay within a +2f tolerance up or down?
Mike—check out my updates to the post above, mostly the updated graph. I closely monitored the temp over 24 hours with a more precise thermometer and I still have great results. Yes, there are deviations every time the compressor turns on and off, but that’ll happen even in a commercial setting. The Johnson controller is still the best one I’ve found given it has that “buffer” for turning on and off the compressor.
Ultimately, I think the best solution would be something like a blast cooler with a high powered fan that turns on when temps get too high, and I’ve now kind of mimicked this with the small fan I have added to the “Upgrades” section in the post. I’m getting even better results now.
But yes, 1-2° deviation should be totally fine.
I have seen a similar tendency to undershoot the set temperature, but in my case it isn’t the Inkbird ITC-308’s fault. I have mine configured for a set point of 49° and a 1° differential. When the temperature reaches 50° the controller turns on the compressor and the refrigerator begins to cool down, and when the temperature reaches 49° the controller turns the compressor off. This is correct behavior.
What I’ve seen though, is that the temperature may continue to go lower for several minutes after the compressor has shut off, especially if there is not much in my retarder. I have seen temperatures get as low as 47°. I imagine the cooling coils continue to cool the box after the compressor is no longer running.
That’s great to hear, Keith! I’ve updated the post with a few items I’ve picked up since writing this, as well as some updated temperatures I’ve gathered when proofing my dough. It still performs incredibly well for me!
Regarding your proof: as you know, it really depends on the batch of dough that day. Perhaps bulk was pushed too far? I know with a recipe such as that one, a 50F overnight proof would surely go over for me as well!
I wonder… Would there be any downside to building this and using it for bulk fermentation as well?
I do use it for bulk! I use it when doing a cold bulk fermentation overnight. It doesn’t have any heating capability (something I’ve been thinking of adding…) so it wouldn’t be able to keep the dough actively warm.
Just have it off during bulk? Currently, I used a large cardboard box with a lamp inside and books to regulate the temp. I can keep the dough between 78 and 81 forever. But would love to have a unit that does both!
Yeah, I usually keep it off when not in use. It keeps cold and I store grains in there when not used. You could turn it into a proofer as well using a dual-plug Inkbird controller and seedling mat (see @danielbothman:disqus comment below!) — I’m thinking of trying this in the future the challenge will be handling humidity in the unit. If it gets too humid over time you’ll get rust if the internals are not suitable for it.
i love this guide and i’m still considering building my own (just for the fun of it) but i was wondering if you think this could work well too? it seems like it could be used for both the proofing and retarding phases so i like that aspect of it and it seems like it would actually be cheaper than building my own from scratch…
https://www.bestbuy.com/site/cooluli-classic-0-1-cu-ft-mini-fridge-white/6401252.p?skuId=6401252
Any small fridge/freezer could work, but that one seems super small!
adding some reptile or seedling heat mats (and possibly a humidifier) and a controller for those could make your retarder a combo retarder / proofer.
what is the reason you chose to convert a freezer instead of a refrigerator? is it because the method of cooling of a manual defrost freezer doesn’t dry the air out as harshly?
https://smile.amazon.com/VIVOSUN-Waterproof-Seedling-Hydroponic-Standard/dp/B00P7U259C/ref=sr_1_11?dchild=1&keywords=reptile+heater&qid=1588795676&sr=8-11
https://smile.amazon.com/Inkbird-Temperature-Controller-Thermostat-Greenhouse/dp/B07HF9W41Y/ref=sr_1_4_sspa?crid=3LW6DULCAW3LR&dchild=1&keywords=temp+and+humidity+controller&qid=1588795602&sprefix=temp+and+humidity+co%2Caps%2C226&sr=8-4-spons&psc=1&spLa=ZW5jcnlwdGVkUXVhbGlmaWVyPUExUzI4QTNFTEpDVFlLJmVuY3J5cHRlZElkPUEwMDM5MDIwTU9ETFNZTk42TExIJmVuY3J5cHRlZEFkSWQ9QTAxMDM5OTAzSlpBSUNWNkpMR0RaJndpZGdldE5hbWU9c3BfYXRmJmFjdGlvbj1jbGlja1JlZGlyZWN0JmRvTm90TG9nQ2xpY2s9dHJ1ZQ==
Adding heating capability is something I’ve been considering for a while now — should work really well! I chose a freezer for a large range of temperatures (can go all the way down to 0°F), the fact that freezers like this are just a large box with no dividers and other things inside, and because it doesn’t dry the air like you mentioned. That said, a fridge would work really well also! I like that Inkbird you linked, the user interface is super simple and could do both heating and cooling… I’ll have to pick these up. If you build it, let me know how it works out for ya!
the range setting controls at what internal temperature the compressor begins to pump [and cool]. if you turn it down, the shutoff point would be at its lowest–way below freezing. the compressor [usually] only runs at one speed. you have placed your digital controller at a higher temperature setting, so it will be the determining controller for the unit’s interior, shutting off power long before [higher, like 45-55f] the unit’s builtin controller.
if the unit had a setting for 55f, it could be used as is. some small refrigerators may…
Yup, that’s exactly right.
Why ruin the freezer by drilling a hole in it? The temp probe cable can be inserted between the freezer chest and the door gasket.
I’ve been brewing beer for years with that setup…
Yes, that’ll work as well! I didn’t have that option given where my freezer is located and how curious my kids are (trust me, they’d find the cable running into it). Plus, a dab of sealant would fix this back up to “normal” in no time.
Maurizio, thank you so much for such a detailed and helpful post!! I am in the process of buying a freezer to follow your step-by-step instructions. I am leaning toward the same one as yours, but bigger (20.2 cu. ft) to accommodate more bannetons. It’s not frost-free though. I was wondering if you’re still happy with your dough retarder, and if you had any other tips after using it for a while?
You’re very welcome, Anne! I am still very happy with my dough retarder. It gets used almost every single day and has been working super well for me. I have some updates to this post coming soon, but just small things (how to reduce humidity when you’re not using it, fans for air circulation, etc.). This totally changed baking for me in the best way possible. Good luck!
Maurizio, is there any way you could provide the interior dimensions (width/depth) of the freezer? All I can find online is exterior measurements. Thinking about pulling the trigger, just want to make sure my equipment will fit. I have some dough boxes that are 17 3/4″ by 12 3/4″.
Justin, interior dimensions are 23″(wide) x 17″ (deep) x 46″ (tall).
Nice work mate. I’m about to replicate your project and have a question. I have the Brod & Taylor Folding Proofer you have as well and while it’s been amazing for me, I now find myself once in a while baking for 6-12 people so sometimes, I’ve out grown it. Question, could this DIY retarder act as my proofer as well when I’m baking for 12 people?
Thanks, Eugene! This is definitely not a proofer as it only has a cool function (there’s no heating element). However, I’ve been thinking about adding a proof function to this fridge as well with a heating mat or heating element with recirculating fan. That said, as it is in the writeup above it’s not able to actively warm anything, just cool.
Yes, a wine cooler will also work very well. I tested with one a while back but I wasn’t able to find one with consistent enough cooling to satisfy my obsessiveness 🙂
Hope that helps!
Also, would a wine cooler do this job?
Thanks for the great site! I’m ready to proceed with a retarder and have a couple of questions. Is there an advantage to using a freezer over a refrigerator as long as there is no auto defrost? Your recent recipes mention cold fermentation but without recommended temperatures. Have you settled on any particular CF temp that works best for you? Hans B.
The reason I prefer the freezer is because there would be no lower bound to the temperature set, meaning I could go all the way down to 0°F if desired. However, a fridge should also work just fine as long as it gets cold enough (it will) — I don’t ever go down below 39°F anyways.
My ideal range has been 39°F – 50°F, depending on the dough, time of proof, and what I’m testing at the time. Usually, though, it’s set at 44°F.
Really great guide. I built a similar unit with a mini fridge – I also added a heat lamp so I’m able to set it either direction for bulk fermentation when the ambient temp is just too low. Works really well for all sorts of fermentation! I’ve been having some difficulty in the overnight retard: whenever I set the temp a little higher (45-50), my loaves end up expanding too much and losing all their oven pop. You mentioned that before you built this, you were dragging out bulk fermentation longer. With this unit do you find you can reduce the bulk time? Or at least the resting time after shaping? I’m wondering if I should reduce these times and jump to the retarder faster knowing they’ll expand more overnight
Great idea with the heat lamp! Here in the desert it’s usually super hot so I just need to turn the unit off to go in the other direction 🙂
Yes, that’s exactly right. Because we’re able to set retard temp a little warmer than a home fridge we can reduce, or even eliminate, that counter proof time before retarding. Think about how the dough will be at a warmer temp all night long, and how this will affect the fermentation activity. Even as little as 2-5°F will have a pretty large impact on the dough proofing overnight. Usually what I end up doing is adjust that retard temp up/down depending on how much activity I detect in the dough: is it super gassy when shaping? If so, drop the temp a few degrees. If the opposite is true, push the temp up and/or proof it longer to offset.
It’s always a balance game with this! Hope that helps.
Many refrigerators (old ones) can be used and just set the dial for a higher temp (50-55 degrees F) This is good for bread. There is a humidity device that you can use to convert an old refrigerator and control temperature and humidity. I think it’s only about 35 dollars to 50 dollars to convert.
How do you control the humidity inside the proofer? At these temperatures, relative humidity can go down as low as 10%.
I have two hygrometers in the retarder and have monitored the humidity since I built this — it usually hovers between 70% and 80%. I know, it seems super high, but when I stick the dough in there it rapidly brings up the humidity level. There have been a few times where the humidity was lower, in the 30’s, and I boiled some water and placed it at the bottom in a small bowl. This rapidly increased the humidity and, since the freezer is sealed, locked it in until the morning.
When I built this I looked into purchasing an electric cigar humidor humidifier (an Oasis) and that was going to be my plan if humidity was too low, but it hasn’t been a problem!
Thanks a lot for this!
I have kept this post as a reference guide since you’ve posted it, and now I finally got to use it!
We just finished building our DIY retarder for our new bakery in BC Canada.
We used an old (and very cheap) Coldstream 24″ reach in cooler, it was ideal because it fits a modified baker’s rack, so we have instant shelving for 20 sheet pans (18″ by 26″). Can easily retard 40 batards or 20 boules in the current setup. Got a very similar module to what you used here and with a bit of drilling and gluing everything is now set up.
Already used it for a batch last night and the dough was bang on!
I will post a full description with photos to TFL and put a link in a sub comment.
Thanks again for saving us thousands of dollars!
Mendi (Two Bald Bakers)
Hey, Mendi! That’s so awesome to hear, and what a great setup with the 20 sheet pans. This fridge would be hard pressed to fit that many without some modification by me (not out of the question, for sure!) but it works for my smaller production right now.
I’m glad my guide could help! Keep me posted on how your bakery is doing, I hope to visit that area of Canada at some point here in the near future. Happy baking!
Hi Maurizio,
Thanks for your reply, please do come visit this area of Canada, its absolutely gorgeous! the summer here is truly amazing! I have to admit though the best bakeries are on Vancouver Island, but we are trying to add some good ones here on the mainland as well. Let me know when this happens, we would love to bake something with you 🙂
Here is the link to my post on TFL:
http://www.thefreshloaf.com/node/54593/how-i-built-semiprofessional-retarder-under-600
I’ll be sure and send you a message if I do! Thanks for the mention over at TFL — your retarder looks awesome! I really like that it can fit standard tray sheets like that… Perhaps I’ll have to mod mine to do so as well. Thanks again for sharing!
Thanks Cynthia! Yes, the warmer temps have really changed the game for me, lots to experiment and play with here! The other night I proofed my pizza dough at 42ºF for 12 hours, next time I’ll go even higher, probably 48ºF or 50ºF. Super awesome to be able to control this now with the flick of a couple buttons.
Thanks again and happy baking (and pizza making, as I know you will be soon)!
Thanks for all the great info you give, Maurizio! Always learning something from you. ????
You bet, Ignacio! I appreciate that 🙂
Hey Maurizio, Nice post. I concur there is a significant difference in retarding at 50 degrees versus 40 and would move bottles of wine in my wine refrigerator (50 degrees) to make room for bread. It had the last laugh and finally gave up the ghost.
Thanks for the references. Figure 1 in the Modeling article 1998 sums it up. At 10 degrees C (50 degrees F) despite the “baker’s rule” this temperature is too cool for yeasts to rule.
Thanks, Rod! Temperature is so, so important with baking, at all levels, I finally decided to build this thing for my testing and experimentation. It’s already been totally worth it. Cheers!
I am totally impressed and can see going in that direction sometime in future. Wish I had not donated my old/working refrigerator though.
Thanks Jinal! Yes, I too had an old freezer a while back I donated — I should have kept it!
Awesome. Sadly I live in 420 square feet.
Thanks! Yes, space is a requirement for this unit and something I do not take for granted. There are smaller freezer units as well!
Can’t wait to hear more about what you’re seeing at various temps and retard lengths!
Beware that these temp control devices can significantly shorten then life of a compressor with the frequent on/offs. I’ve long ago accepted that downside for my beer ferm freezer and freezer kegorator 🙂
That was something I was worried about, while I’d be ok with replacing the compressor after several years I’d hate to have to do it sooner. The controller unit I used here has an “idle” time that you can customize, this will let the compressor rest for some period before it kicks on. The default is 1 minute so it shouldn’t constantly kick it on and then turn it off, and kick it on again. Additionally, we can always set the ON and OFF thresholds just a bit wider so it’s also not so tight of a temperature range.
Since I unplug the unit when not in use, it really only sees an overnight time period when it’s on and that’s only when I’m baking (which, admittedly, is very often!).
Thanks for the input on that!
Yeah for sure, it wasn’t going to stop me from doing it regardless haha.
I will give building one of these some serious thought. I’m not seeing a small freezer in my future though. I’m not sure I can sell that idea to the Mrs!
Before I got an Anova sous vide pump for Christmas I was using a ‘make do’ set up that includes a controller similar to the one you describe. I used a slow cooker for the water bath and the controller by-passed the cooker’s thermostat and switched it on and off to maintain the desired temperature. I’m pretty sure it will work in this application too. I’ll let you know how it goes.
Awesome! Yes, sounds like the same principle as I’ve done here with this retarder unit. Keep me posted!
Oh my!!!! I now will add this to the Rofco and Lacanche ovens I’ve been coveting! I’m going to need a separate kitchen just for baking I think!
The holy trinity of ovens and baking equipment 🙂 Yes, I wish I had a dedicated baking kitchen as well… One can dream 🙂
i’ve got a rofco 40 in my home kitchen and a dedicated retarding fridge.. i’m currently churning out over 100 loaves over thurs/fri so no need for separate kitchens. its a challenge but all possible! Rofco and a spiralising mixer have been my top purchases .. worth every penny … now i just need a Machine for rolling buns and doughnuts .. but they cost an arm and a leg
I just got a Rofco 40 as well — it’s a fantastic little oven. That’s quite the production, Tamsin!
If you wanted to retard dough in bulk prior to shaping and proofing, would you retard at the same temp? Or would you retard at a lower temp similar to the family fridge (35-38F)?
Another temp controller out there, the STC-1000 is a really nice and inexpensive (<$20) option that many of us homebrewers have been using in our fermentation chambers. With a little DIY temp controller box, you can have a very capable rig for a wide range of foodstuff.
This is a good question and something I’ll be experimenting with, I want to do more bulk retarding in the future. I will definitely be trying a bulk retard at temps from 40ºF to 50ºF, I know some pro bakers do this and it’s something I want to experiment with!
Yes! I looked at the STC-1000 and almost picked that one up but I found the one I ended up going with. I chose the Johnson Controls unit because I didnt have to build another box to hold the controller (I know it’s not necessary but I’m a clean freak :)). This controller is also extremely versatile and can do many functions besides what I’m using it for, although the STC might have more capability I’m not sure.
Thanks for the comments!
In step 4 why do you need to “set the interior freezer temperature thermostat to” whatever? if you connect an external temperature controller won’t it take over whatever the default rudimentary controller is?
Yup, that’s correct. I just set the built-in thermostat to coldest because that’ll be the lower limit for this freezer (probably 0ºF). If you had it set to “warmest”, which might be something like 45ºF, and you wanted your programmed controller to go down to 35ºF it would never cool down to that temperature because the built-in thermostat always takes priority. This way, we can ensure our new temperature controller can always cool down to the lowest temp the freezer can achieve.
if the built in thermostat always takes priority why would it not go down to 0F? why would it stop at 35F?
If you set the built-in thermostat to 35ºF, and the programmed controller to 0ºF, the freezer would only ever go down to 35ºF.
The built in thermostat has direct control of the compressor (cooling mechanism) in the freezer. The programmed controller would supply power to the freezer to cool to 0ºF constantly but the built in thermostat would turn off the compressor when the temp inside reached 35ºF.
By setting the built in thermostat to the coldest setting we ensure that when the programmed controller provides power, the built in thermostat will turn the compressor on no matter what the set temperature is. Essentially the built in thermostat just turns on the compressor always and we are letting the programmed controller decide when to turn it off.